
Ukrainian Eggs have been a part of my family's spring tradition since my daughters were very young. It is an art that can start very simple and grow in complexity as children get older. Here is a simple version using only flower petals for color!
Start by soaking your eggs in a solution of vinegar and water (half and half) for an hour or two. No longer! This will dissolve the outer coating on the egg so it will absorb the delicate flower colors. (If you leave it over night the whole shell will start to melt!) You will see little bubbles all over the egg like this:

Rub off the gooey outer coating. If you want to blow out the inside of your egg, now is a good time to do it. There are several cool little egg blowers on the market that make this easy. Or, drill a small hole on both ends of your egg and blow it out yourself.
Now you are ready to color your egg!
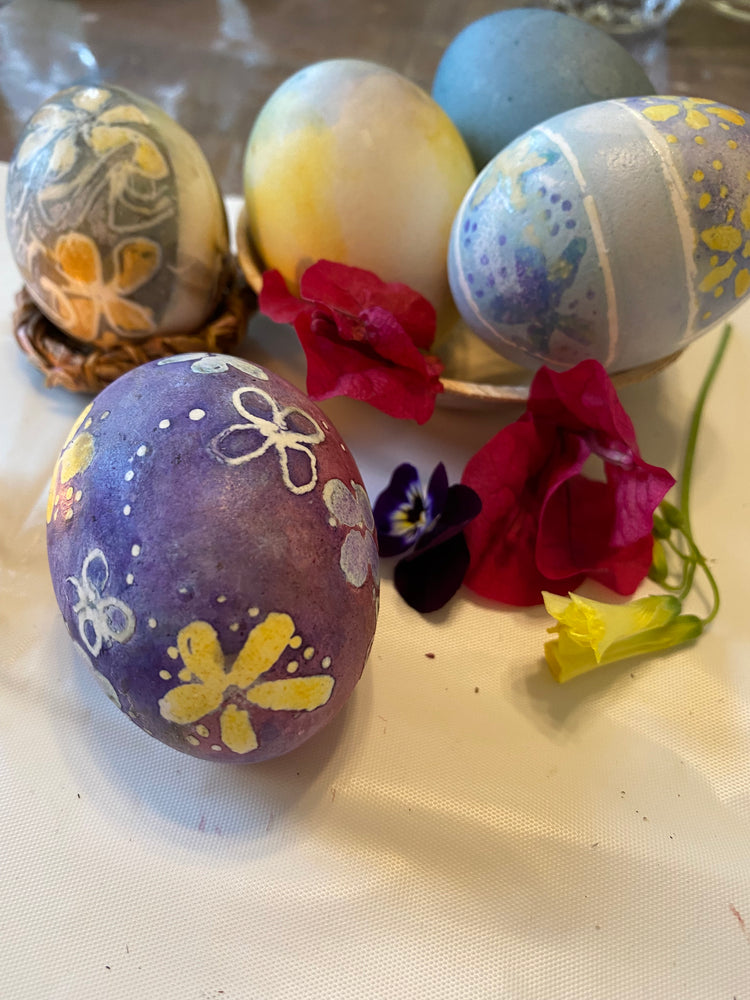
Find flowers that have dark, concentrated color in the petals. You only need one or two per egg. I used purple Pansies, Oxalis (sour grass) for yellow and Bougainvillea for red.
The most basic egg is colored by simply rubbing the petals directly onto the surface. This is a great educational moment! The artist must find the right amount of pressure- enough to apply color, but not so much as to break the egg.
If you are using yellow Oxalis flowers, remember that the juice will act like a bleach, shifting any other color it touches. This is handy for achieving pretty gradations of colors on the surface.
Let it be said here: I am not aiming to reproduce chemical dyes. Rather I want to discover what colors are hidden in the flowers and how they interact. I love soft cloudy movement of color on the surface!

Ready for something harder?
Traditional Pysanky eggs use as many as nine layers of color and wax. Here we will just use two layers of wax.
Prepare your egg as before. Now you will need :
A Kistka or Pysanky traditional wax pen (There are many kinds available online.)
Bees wax
Candle
Paper towels or a rag
Flowers for color
Start by breaking little pieces of bees wax and drop them into the cup of your wax pen.
Hold it over a candle flame until the wax melts and starts to come out of the pen tip. Every pen is different, you will find your favorite. (Here's another teachable moment- Don't touch the hot cup! Watch young artists very carefully for this now! Keep the cup upright so it doesn't spill. ) Before drawing on your egg, practice drawing on a piece of paper. Then when you are ready, draw some wax designs on your egg. Everything you are drawing on this first pass will remain white on the finished egg. As the wax in the cup cools, warm again over the flame as needed.
I highly recommend drawing "scribble scrabble" the first time you try this. Dots are fun, as are simple flowers. Don't try to make it perfect!!!! Just have fun. It's also fun to place rubber bands of your egg at this point to add to your design. Don't worry if your wax gets black- it won't matter.


Now, rub your flowers of choice in little patches here and there.


Allow the colors to dry and add wax over the dried colors, this will protect the color from the next layer going on. Here are a couple different examples.


Now you have two choices: You can rub another color all over the egg. Here I rubbed color in contrasting colors to the wax flowers I drew - I rubbed blue over the yellow flowers, and yellow over the blue ones.

Or, prepare s strong flower tea ( I used Blue Butterfly flowers, available online), allow the tea to cool and drop your waxed egg in - like a regular dye. But leave it in much longer- between one hour and overnight.


Now, another delicate moment- time to melt the wax off.
When your background color is the desired shade, allow it to dry completely. Take off any rubber bands now.
Hold your egg close enough to the candle flame to melt the wax, and then little by little, as the wax melts, wipe it off with a paper towel. This will not only remove the wax, but create a protective coating of wax over the whole egg. Don't hold the egg IN the flame, or it will be stained by soot. It should take about 20 minutes to remove all the wax. Explain this to the young artist first. This is that exciting end of a project that we must not rush through. It's better to take the time needed to make it really beautiful- there-by respecting all the care you put in earlier.


Voila! Enjoy them for years to come!!
